Homemade Seeded Whole Wheat Bread with a Soft Center and Crunchy Seeded Crust
A Delicious Homemade Whole Wheat Bread for Everyday Baking
Homemade seeded whole wheat bread is one of the most rewarding recipes you can prepare in your own kitchen. The wonderful aroma of freshly baked bread, combined with a golden crust and a soft, fluffy interior, creates a loaf that is far superior to many store-bought alternatives. This easy whole wheat bread recipe combines wholesome ingredients with simple baking techniques, making it suitable for both beginner and experienced bakers. Every slice delivers a satisfying balance of hearty whole wheat flavor and the pleasant crunch of nutritious seeds. Whether served for breakfast, lunch, or dinner, this homemade loaf adds freshness and quality to every meal while offering a comforting homemade taste that everyone enjoys.
Why Homemade Seeded Whole Wheat Bread Is Worth Baking
Preparing bread from scratch allows you to control every ingredient that goes into the loaf. Unlike many commercial breads that contain preservatives and unnecessary additives, homemade whole wheat bread offers a cleaner ingredient list while maintaining outstanding flavor and texture. The combination of whole wheat flour and all-purpose flour creates a loaf that is hearty without becoming overly dense. Adding a blend of seeds enhances both taste and texture, making each slice more interesting and enjoyable. The result is a healthy homemade bread that is ideal for sandwiches, toast, or serving alongside soups and salads throughout the week.
The Perfect Combination of Soft Bread and Crunchy Seeds
One of the reasons this easy seeded bread recipe stands out is the contrast between its soft crumb and crisp crust. Inside, the bread remains tender, moist, and light enough for everyday use, while the exterior develops a beautiful golden finish during baking. The toasted seeds incorporated into the dough provide subtle bursts of nutty flavor throughout each slice, while the seeds sprinkled over the top become perfectly crisp in the oven. This combination creates a bakery-style whole wheat bread that feels both rustic and refined without requiring complicated baking techniques.
Whole Wheat Flour Creates Rich Flavor and Better Texture
Whole wheat flour is the foundation of this homemade bread recipe because it provides a naturally rich, earthy taste that cannot be achieved with white flour alone. Since the flour contains the bran and germ of the wheat kernel, it contributes additional texture, fiber, and a deeper flavor profile. However, using only whole wheat flour may result in a heavier loaf. Blending it with all-purpose flour allows the dough to develop a lighter structure while still preserving the wholesome qualities that make whole wheat bread such a popular choice among home bakers looking for nutritious everyday bread.
Why All-Purpose Flour Improves the Bread
Adding all-purpose flour is a simple adjustment that significantly improves the final loaf. The lighter protein structure helps create better gluten development, allowing the bread to rise higher and produce a softer crumb. Instead of becoming compact or overly heavy, the loaf remains airy while still maintaining the hearty characteristics of whole wheat bread. This balanced flour combination makes the bread suitable for sandwiches, French toast, breakfast toast, grilled sandwiches, and countless other everyday recipes that benefit from a soft yet sturdy slice.
Choosing the Best Seed Blend for Homemade Bread
Seeds contribute much more than decoration. They provide additional flavor, texture, and nutritional value while giving the bread an attractive artisan appearance. A blend of flax seeds, sunflower seeds, and white sesame seeds works exceptionally well because each variety offers its own unique qualities. Flax seeds provide a mild earthy flavor, sunflower seeds contribute a satisfying crunch, and sesame seeds add a delicate nutty finish. Together they create a balanced mixture that complements the whole wheat flour without overpowering the bread’s natural taste.
Additional Seed Options for More Flavor
Although flax, sunflower, and sesame seeds create an excellent combination, this recipe can easily be customized using other nutritious seeds that may already be available in your pantry. Pumpkin seeds provide larger bites with extra crunch, chia seeds blend smoothly into the dough while adding texture, poppy seeds create delicate crispness, black sesame seeds contribute a deeper roasted flavor, and hemp seeds offer a gentle nuttiness. Mixing different varieties allows every loaf to have its own personality while maintaining the wholesome character that makes seeded whole wheat bread so enjoyable.
Toasting Seeds Before Mixing Them into the Dough
A simple step that greatly improves flavor is lightly toasting the seeds before adding them to the bread dough. Gentle heat releases the natural oils contained within the seeds, producing a richer aroma and a deeper nutty taste. Toasting also helps the seeds maintain their pleasant texture after baking. It is important to watch them carefully because seeds can brown quickly. Once lightly golden and fragrant, allowing them to cool before mixing ensures they blend evenly into the dough without affecting the yeast or dough temperature.
Understanding the Role of Each Ingredient
Every ingredient serves a specific purpose in creating the perfect homemade whole wheat bread. Whole wheat flour provides body and nutrition, while all-purpose flour creates softness. Instant yeast allows the dough to rise efficiently and develop a light structure. Olive oil keeps the crumb moist and tender while adding subtle richness. Honey balances the slightly robust flavor of whole wheat flour with gentle natural sweetness. Salt strengthens the dough while enhancing every ingredient’s flavor. Together, these simple ingredients work in harmony to produce a bakery-quality loaf with excellent texture and taste.
Mixing the Dough Correctly for the Best Results
Making bread dough begins by combining the dry ingredients thoroughly before introducing the liquids. Once the toasted seeds, flours, yeast, and salt are evenly distributed, warm water, olive oil, and honey are added to create a shaggy dough. At this stage, the mixture may appear rough and sticky, which is completely normal. As the ingredients continue to hydrate, the flour gradually absorbs moisture and begins developing gluten. There is no need to worry if the dough looks uneven during the first few minutes because kneading will transform it into a smooth and elastic dough.
Kneading Builds Structure and Strength
Kneading is one of the most important stages in homemade bread baking because it develops the gluten network responsible for the bread’s final texture. During kneading, proteins within the flour align and strengthen, allowing the dough to trap gases released by the yeast. This process creates a loaf with excellent volume and a soft interior. Although the dough may initially stick to your hands, resist adding excessive flour since this can produce dry bread. With steady kneading, the dough naturally becomes smoother, more elastic, and easier to handle, indicating that it is ready for the first rise.
he Importance of the First Rise
After kneading, the dough should be shaped into a smooth ball and placed in a lightly oiled bowl. Covering the bowl helps prevent the surface from drying out while the yeast begins its work. During this resting period, the dough expands as carbon dioxide is produced, creating the tiny air pockets that give homemade bread its soft texture. Allowing the dough to double in size without rushing the process is one of the simplest ways to achieve a light and fluffy loaf. A warm, draft-free location encourages consistent rising and helps the dough develop a richer flavor.
Shaping the Dough for an Even Loaf
Once the first rise is complete, gently press the dough to release excess air without removing all of the trapped bubbles. Flattening it into a rectangle before rolling it into a tight log creates an even shape that bakes uniformly. Pinching the seam firmly closed helps the loaf keep its structure during the second rise and while baking. Placing the seam side down in the prepared loaf pan also creates a smoother top, giving the finished bread a professional bakery-style appearance.
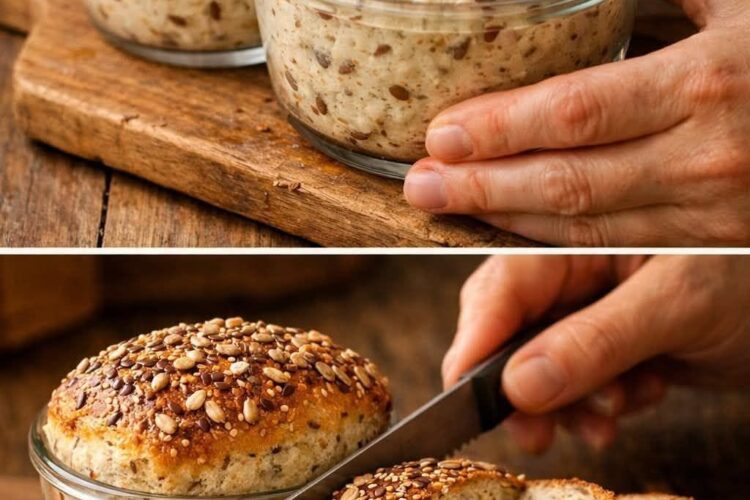
Creating a Beautiful Seeded Crust
One of the most attractive features of this homemade seeded bread is its crunchy, golden topping. Brushing the shaped dough with egg wash creates a glossy finish while helping the seeds stick securely to the surface. Sprinkling the mixed seeds evenly across the top ensures every slice contains a pleasant crunch. As the bread bakes, the seeds become lightly toasted, adding both flavor and visual appeal. This simple finishing touch transforms an everyday loaf into an artisan-style bread that looks as impressive as it tastes.
Why the Second Rise Matters
The second proof gives the shaped loaf its final volume before baking. During this stage, the dough relaxes and expands inside the loaf pan, creating the soft interior that makes homemade sandwich bread so enjoyable. Patience is important because baking the loaf too early may result in a dense texture, while allowing it to rise properly encourages a lighter crumb. When the dough reaches the top edge of the pan or rises slightly above it, it is ready to be placed in the preheated oven.
Baking the Bread to Golden Perfection
Baking is where all the preparation comes together. As the loaf enters the hot oven, the yeast experiences its final burst of activity before the heat sets the structure of the bread. The crust gradually becomes deep golden brown while the inside finishes cooking into a soft, tender crumb. For the most accurate results, checking the internal temperature with a digital thermometer ensures the bread is fully baked. An internal temperature of 190°F indicates that the loaf is ready to be removed from the oven.
Cooling Before Slicing
Fresh bread is always tempting, but allowing it to cool completely is essential for achieving the best texture. As the loaf cools, moisture redistributes throughout the crumb, creating clean slices that hold together well. Cutting into the bread too soon can compress the interior and make it appear slightly gummy. Cooling on a wire rack also prevents moisture from collecting underneath the loaf, helping the crust remain pleasantly crisp while the inside stays soft and tender.
Delicious Ways to Serve Seeded Whole Wheat Bread
This homemade whole wheat bread is incredibly versatile and fits into nearly every meal of the day. Thick slices make outstanding sandwiches filled with fresh vegetables, cheese, grilled chicken, or classic deli fillings. Toasted slices topped with butter, jam, honey, peanut butter, or avocado create a satisfying breakfast or afternoon snack. The bread also pairs beautifully with soups, stews, salads, and pasta dishes, making it a dependable addition to both everyday family meals and special occasions.
Storing Homemade Bread Properly
Proper storage helps preserve the freshness of homemade bread for several days. Once completely cooled, the loaf should be wrapped well or placed in an airtight container at room temperature. Avoid refrigerating the bread because cold temperatures can cause it to dry out more quickly. If the loaf will not be eaten within a few days, slicing and freezing it is an excellent option. Individual slices can be toasted directly from frozen, making homemade bread convenient whenever it is needed.
Simple Variations to Customize the Recipe
One of the greatest advantages of baking bread at home is the ability to personalize the recipe according to individual preferences. Different seed combinations create new flavor profiles, while replacing honey with maple syrup, date syrup, or agave syrup provides an easy vegan alternative. Herbs, spices, or dried grains may also be incorporated into the dough for additional character. These small adjustments allow the same basic recipe to produce a variety of delicious homemade loaves without changing the fundamental baking process.
Common Mistakes to Avoid
Successful bread baking often comes down to avoiding a few simple mistakes. Adding excessive flour during kneading can produce a dry, heavy loaf, while insufficient kneading prevents proper gluten development. Using water that is too hot may damage the yeast, reducing the dough’s ability to rise. Baking before the second proof is complete can also result in dense bread with limited volume. Taking time with each stage of the process leads to consistently excellent results and a loaf with outstanding flavor and texture.
Notes
For the richest flavor, lightly toast the seeds that are mixed into the dough before combining them with the flour. Leave the topping seeds untoasted so they become perfectly crisp while baking.
If preparing a vegan version, replace the honey with maple syrup, date syrup, or agave syrup. The egg wash can be substituted with aquafaba or a suitable vegan alternative to help the seeds adhere to the loaf.
Using a combination of whole wheat flour and all-purpose flour creates a softer loaf while maintaining the hearty flavor associated with whole wheat bread. Although the recipe can be prepared using only whole wheat flour, the finished bread will have a denser texture.
Always allow the bread to cool completely before slicing. This simple step improves both the texture and appearance of each slice while helping the loaf retain its moisture.
Store leftover bread at room temperature in an airtight container for several days. For longer storage, freeze individual slices and toast them as needed to enjoy fresh-tasting homemade bread anytime
Homemade Seeded Whole Wheat Bread with a Soft Center and Crunchy Seeded Crust
Description
This homemade seeded whole wheat bread features a soft, fluffy interior and a crisp, golden crust coated with nutritious mixed seeds. Made with whole wheat flour, all-purpose flour, olive oil, honey, and a blend of flax, sunflower, and sesame seeds, this wholesome loaf delivers excellent flavor, texture, and freshness. It is ideal for sandwiches, breakfast toast, or serving alongside your favorite soups and salads.
Preparation & Cooking Duration
- Preparation Time: 20 minutes
- First Rise: 1 hour
- Second Rise: 30–60 minutes
- Cooking Time: 50–60 minutes
- Total Time: Approximately 2 hours 50 minutes to 3 hours 20 minutes
Servings
- 4 servings
Ingredients
- ½ cup (70 g) mixed seeds (such as flax seeds, sunflower seeds, and sesame seeds)
- 2¾ cups (330 g) whole wheat flour
- 1 cup (120 g) all-purpose flour
- 1 tablespoon (9 g) kosher salt
- 1 tablespoon instant yeast
- 1¼ cups (300 ml) hot water (105°F–115°F)
- 2 tablespoons extra virgin olive oil, plus additional for greasing the bowl and loaf pan
- 1 tablespoon honey
For the Topping
- 1 egg
- 1 tablespoon water
- ¼ cup mixed seeds
Step-by-Step Instructions
- Preheat the oven to 350°F (175°C). Spread the mixed seeds intended for the dough onto a baking tray in a single layer. Toast them for 5–10 minutes until lightly golden and fragrant. Remove from the oven and allow them to cool slightly.
- In a large mixing bowl, combine the toasted seeds, whole wheat flour, all-purpose flour, kosher salt, and instant yeast. Stir until all the dry ingredients are evenly blended.
- Add the hot water, extra virgin olive oil, and honey to the dry ingredients. Mix with a wooden spoon or sturdy spatula until a rough, shaggy dough forms.
- Transfer the dough to a lightly floured work surface. Knead for approximately 10 minutes, until the dough becomes smooth, elastic, and only slightly tacky. Avoid adding excessive flour during kneading.
- Shape the dough into a smooth ball. Lightly grease a clean bowl with olive oil, place the dough inside, cover, and allow it to rise in a warm place for about 1 hour, or until doubled in size.
- Grease a loaf pan with olive oil. Place the risen dough onto a lightly floured surface, gently flatten it into a rectangle, then roll it tightly into a log. Pinch the seam closed and place it seam-side down in the prepared loaf pan.
- In a small bowl, whisk together the egg and 1 tablespoon of water to prepare the egg wash. Brush the surface of the dough evenly, then sprinkle the remaining mixed seeds over the top.
- Cover the loaf pan loosely and allow the dough to proof for 30–60 minutes, or until it reaches the top edge of the pan or rises slightly above it.
- Bake the bread for 50–60 minutes, or until the crust is deep golden brown and the internal temperature reaches 190°F (88°C).
- Remove the bread from the loaf pan immediately and transfer it to a wire cooling rack. Let it cool completely before slicing to achieve the best texture and clean slices.
Nutritional Information
Approximate values per serving
- Calories: 300 kcal
- Carbohydrates: 49 g
- Protein: 11 g
- Total Fat: 8 g
- Saturated Fat: 1 g
- Fiber: 7 g
- Sugars: 4 g
- Sodium: 620 mg
- Cholesterol: 23 mg


