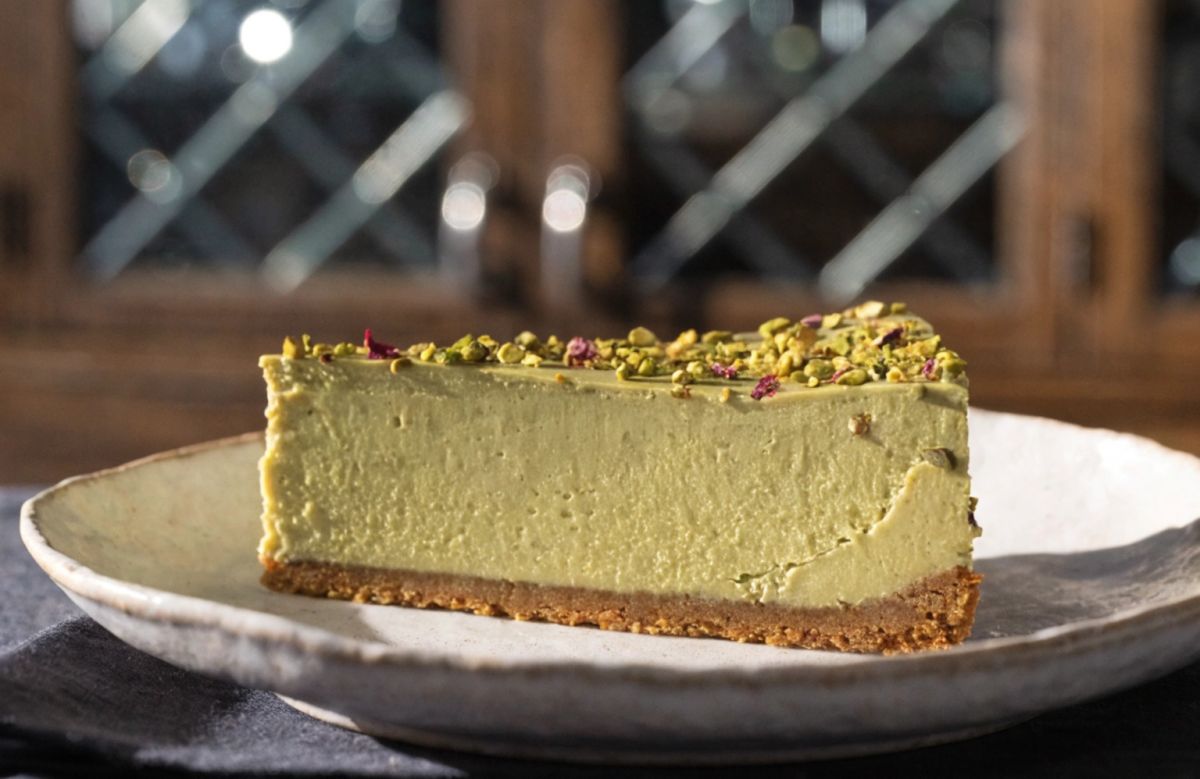
If you are searching for a luxurious dessert that combines the rich creaminess of cheesecake with the delicate nutty flavor of pistachios, this Thermomix Pistachio Cheesecake is the perfect recipe. Smooth, velvety, and beautifully balanced, this cheesecake is an elegant treat suitable for birthdays, family gatherings, dinner parties, or simply whenever you crave something special.
Using a Thermomix makes the entire process much easier. From crushing the biscuit base to blending the silky cheesecake filling, the machine ensures perfect consistency with minimal effort. The result is a professional-quality dessert that looks stunning and tastes even better.
Pistachios have long been considered one of the most luxurious nuts in the world. Their naturally sweet flavor, vibrant green color, and crunchy texture elevate desserts to a gourmet level. Combined with cream cheese, fresh cream, and a buttery biscuit crust, they create a cheesecake that is both sophisticated and comforting.
This recipe provides detailed instructions, expert tips, serving suggestions, storage guidance, and variations to help you create the ultimate Thermomix Pistachio Cheesecake.
Why You’ll Love This Recipe
- Easy to prepare with a Thermomix.
- Rich and creamy texture.
- Beautiful natural pistachio flavor.
- Perfect for celebrations and holidays.
- Can be made ahead of time.
- Elegant presentation.
- Customizable with different toppings.
- Ideal for beginner and experienced bakers alike.
Preparation Time
| Task | Time |
|---|---|
| Preparation | 20 minutes |
| Baking | 55 minutes |
| Cooling | 1 hour |
| Chilling | 6 hours |
| Total Time | Approximately 8 hours |
Yield
- Serves: 10–12 people
- One 9-inch cheesecake
Ingredients
For the Biscuit Base
- 250g digestive biscuits or graham crackers
- 120g unsalted butter, melted
- 1 tablespoon brown sugar
- Pinch of salt
For the Pistachio Cheesecake Filling
- 250g shelled pistachios
- 750g full-fat cream cheese, softened
- 200g caster sugar
- 250ml heavy cream
- 3 large eggs
- 2 egg yolks
- 1 teaspoon vanilla extract
- 2 tablespoons cornstarch
- 1 tablespoon lemon juice
- Pinch of salt
For the Pistachio Topping
- 100g shelled pistachios, chopped
- 150ml whipping cream
- 2 tablespoons powdered sugar
- Crushed pistachios for garnish
Optional:
- White chocolate shavings
- Fresh berries
- Pistachio cream drizzle
Equipment Needed
- Thermomix
- 9-inch springform pan
- Baking paper
- Mixing bowls
- Spatula
- Cooling rack
- Sharp knife
Step 1: Prepare the Pan
Begin by preparing your springform pan.
- Grease the base and sides lightly.
- Line the bottom with baking paper.
- Preheat the oven to 160°C (320°F).
Proper preparation prevents sticking and ensures easy removal.
Step 2: Make the Biscuit Base
Place the biscuits into the Thermomix bowl.
Mix:
- 10 seconds / Speed 8
The biscuits should resemble fine crumbs.
Add:
- Melted butter
- Brown sugar
- Salt
Mix:
- 15 seconds / Speed 4
The mixture should resemble wet sand.
Transfer the crumb mixture into the prepared pan.
Press firmly using the back of a spoon or a flat-bottomed glass.
Bake for:
- 10 minutes
Remove and allow to cool.
Step 3: Prepare the Pistachios
Add pistachios to the Thermomix bowl.
Blend:
- 20 seconds / Speed 9
Scrape down the sides.
Blend again:
- 10 seconds / Speed 9
You should have a very fine pistachio powder.
This step is essential for achieving a smooth cheesecake texture.
Set aside.
Step 4: Make the Cheesecake Filling
Place into the Thermomix bowl:
- Cream cheese
- Sugar
Mix:
- 30 seconds / Speed 5
Scrape down the sides.
Add:
- Heavy cream
- Pistachio powder
- Vanilla extract
- Lemon juice
- Cornstarch
- Salt
Mix:
- 40 seconds / Speed 5
Add eggs and yolks.
Mix:
- 20 seconds / Speed 4
Avoid overmixing after adding eggs to prevent excess air bubbles.
The filling should now be smooth, creamy, and pale green.
Step 5: Fill the Cheesecake Pan
Pour the cheesecake filling onto the cooled crust.
Tap the pan gently on the counter several times.
This helps release trapped air bubbles.
Smooth the top using a spatula.
Step 6: Prepare a Water Bath
Wrap the outside of the springform pan with two layers of aluminum foil.
Place the pan inside a larger roasting tray.
Fill the tray with hot water until it reaches halfway up the sides.
A water bath helps create a creamy cheesecake and prevents cracking.
Step 7: Bake
Carefully transfer the cheesecake to the oven.
Bake at:
- 160°C (320°F)
for:
- 50–55 minutes
The center should still have a slight wobble when gently shaken.
Do not overbake.
The cheesecake will continue setting as it cools.
Step 8: Cool Gradually
Turn off the oven.
Leave the cheesecake inside with the door slightly open for 1 hour.
This gradual cooling process minimizes cracks.
Remove from the oven.
Allow to cool completely at room temperature.
Step 9: Chill
Transfer the cheesecake to the refrigerator.
Chill for at least:
- 6 hours
Preferably overnight.
The flavor improves significantly after a long chill.
Step 10: Prepare the Whipped Cream Topping
Place whipping cream and powdered sugar into the Thermomix bowl.
Whip:
- Speed 3.5
Watch carefully until soft peaks form.
Do not overwhip.
Spread or pipe the cream over the chilled cheesecake.
Step 11: Garnish
Decorate with:
- Chopped pistachios
- Crushed pistachios
- White chocolate curls
- Fresh berries
The vibrant green pistachios create a beautiful gourmet appearance.
Expert Tips for Success
Use Full-Fat Cream Cheese
Low-fat cream cheese can affect texture and richness.
Room Temperature Ingredients
Always bring ingredients to room temperature before mixing.
Don’t Overmix Eggs
Overmixing incorporates excess air, which may cause cracks.
Chill Overnight
The cheesecake becomes firmer and more flavorful after a full night in the refrigerator.
Use Fresh Pistachios
Fresh pistachios provide the best flavor and color.
Flavor Variations
White Chocolate Pistachio Cheesecake
Add:
- 200g melted white chocolate
to the filling.
This creates an even richer dessert.
Rose Pistachio Cheesecake
Add:
- 1 teaspoon rose water
for a Middle Eastern-inspired flavor.
Chocolate Pistachio Cheesecake
Mix:
- 2 tablespoons cocoa powder
into the filling.
Top with chocolate ganache.
Pistachio Lemon Cheesecake
Add:
- Extra lemon zest
for a refreshing citrus twist.
Serving Suggestions
This cheesecake pairs beautifully with:
- Espresso coffee
- Cappuccino
- Green tea
- Mint tea
- Fresh strawberries
- Raspberry sauce
- White chocolate drizzle
Serve chilled for the best texture.
Storage Instructions
Refrigerator
Store in an airtight container for up to 5 days.
Freezer
Freeze individual slices for up to 2 months.
Wrap each slice tightly in plastic wrap and foil.
Thaw overnight in the refrigerator before serving.
Nutritional Information (Per Slice)
Approximate values:
| Nutrient | Amount |
|---|---|
| Calories | 520 |
| Protein | 10g |
| Carbohydrates | 30g |
| Fat | 40g |
| Fiber | 2g |
| Sugar | 22g |
Values may vary depending on ingredients used.
Common Mistakes to Avoid
Skipping the Water Bath
This can lead to cracks and uneven baking.
Overbaking
A slightly wobbly center is ideal.
Using Cold Ingredients
Cold ingredients can create lumps.
Rushing the Chilling Time
Patience results in a much better cheesecake.
Not Grinding Pistachios Properly
Large pieces can affect the silky texture.
Conclusion
This Thermomix Pistachio Cheesecake is the ultimate gourmet dessert, combining the luxurious flavor of pistachios with the irresistible richness of classic cheesecake. Thanks to the Thermomix, preparation becomes simple and efficient while delivering bakery-quality results. The buttery biscuit crust, smooth pistachio filling, and crunchy pistachio topping create a dessert that is elegant enough for special occasions yet comforting enough to enjoy any time.
Whether you’re making it for a family celebration, a holiday feast, or simply to satisfy your sweet tooth, this cheesecake is guaranteed to impress. One slice is never enough, and its creamy texture, nutty aroma, and beautiful presentation make it a dessert you’ll truly devour. Enjoy every bite!