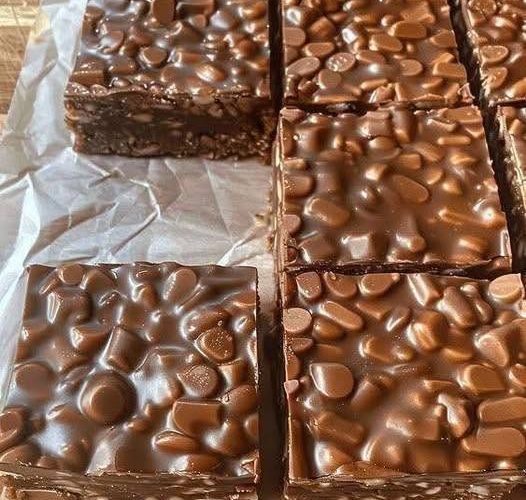
No-Bake Chocolate Peanut Butter Crunch Bars are an easy homemade dessert for anyone who loves the combination of rich chocolate, creamy peanut butter, and crispy rice cereal. These delicious chocolate peanut butter bars offer a satisfying contrast between a smooth chocolate coating and a light, crunchy center. Made with chocolate chips, peanut butter, pure maple syrup, coconut oil, and crispy rice cereal, they deliver plenty of flavor without requiring an oven. Whether you need a quick afternoon snack, a simple dessert after dinner, or a sweet treat to share with friends and family, this no-bake recipe is an excellent choice.
Why You Will Love These Chocolate Peanut Butter Crunch Bars
One of the best things about these homemade chocolate peanut butter crunch bars is how easily they come together. The ingredients are combined into a smooth chocolate mixture, tossed with crispy rice cereal, and pressed into a baking dish before chilling in the refrigerator. There is no complicated baking process, special equipment, or lengthy preparation involved. The finished bars are rich, crunchy, and easy to portion into individual servings, making them suitable for everyday snacking, dessert platters, family gatherings, and homemade food gifts.
What Makes This No-Bake Dessert So Special
These no-bake chocolate peanut butter bars stand out because they combine familiar pantry ingredients with a simple preparation method. Melted chocolate creates a rich base, while peanut butter adds a creamy texture and nutty taste. Pure maple syrup contributes sweetness, and coconut oil helps the chocolate mixture melt evenly and become firm when chilled. Crispy rice cereal brings everything together with a delicate crunch in every bite. Since the bars set in the refrigerator instead of the oven, they are especially convenient during warm weather or on days when you want a homemade dessert without heating up the kitchen.
The Perfect Balance of Chocolate and Peanut Butter
Chocolate and peanut butter are a classic dessert combination because their flavors complement each other so naturally. Chocolate brings depth and sweetness, while peanut butter adds a roasted, nutty character that makes each bite taste fuller and more satisfying. In this recipe, the two ingredients form the main coating for the crispy rice cereal, creating bars that feel indulgent without being overly complicated. You can choose chocolate chips that match your preferred sweetness level, allowing the finished dessert to have a darker chocolate flavor or a sweeter, creamier taste.
Understanding the Ingredients for the Best Results
Each ingredient in this easy no-bake dessert recipe has a specific purpose. Chocolate chips provide the main chocolate flavor and help bind the cereal together once the mixture has chilled. Peanut butter adds richness and creates a smooth coating around the crunchy cereal. Crispy rice cereal provides the light texture that gives these bars their signature crunch. Pure maple syrup adds sweetness and helps bring the ingredients together, while coconut oil supports smooth melting and helps the chocolate mixture firm up in the refrigerator. Measuring everything carefully helps create bars that hold together well and slice neatly.
Choosing Chocolate Chips for Your Crunch Bars
The type of chocolate chips you choose can make a noticeable difference in the final flavor. Dark chocolate chips create a deeper, more intense chocolate taste that pairs beautifully with peanut butter. Semi-sweet chocolate chips offer a balanced flavor, while milk chocolate chips make the bars sweeter and creamier. White chocolate chips can provide a different flavor profile if you enjoy a sweeter dessert. Whatever variety you choose, melt the chocolate slowly and stir frequently to keep the mixture smooth. Gentle heating is important because overheated chocolate can become thick, grainy, or difficult to combine with the other ingredients.
Selecting the Right Peanut Butter
Peanut butter plays an important role in both the flavor and texture of these chocolate peanut butter bars. Smooth peanut butter is an excellent option when you want an even, creamy mixture that coats every piece of cereal. Crunchy peanut butter introduces additional peanut pieces, creating a more textured dessert. Natural peanut butter can also work, but it should be stirred thoroughly before measuring because its oil may separate during storage. Choose a peanut butter with a consistency that mixes easily with melted chocolate. A well-combined mixture makes it easier to coat the cereal evenly and press the bars into a compact layer.
Why Crispy Rice Cereal Creates the Best Crunch
Crispy rice cereal gives this dessert its light, airy texture and prevents the chocolate mixture from feeling too dense. When coated with chocolate and peanut butter, the cereal creates a satisfying contrast between the smooth outer mixture and the crisp center. For the best results, add the cereal to a large mixing bowl before pouring the melted ingredients over it. Stir gently but thoroughly so the pieces remain as intact as possible while becoming evenly coated. Crushing the cereal too much can make the finished bars denser, so use a folding motion rather than vigorous mixing.
The Role of Pure Maple Syrup and Coconut Oil
Pure maple syrup adds sweetness and a subtle caramel-like flavor that works well with chocolate and peanut butter. It also contributes to the consistency of the mixture, helping the ingredients combine into a cohesive coating. Coconut oil assists with melting and creates a mixture that firms up as it cools. Together, these ingredients help give the bars their characteristic texture without requiring a baking step. For a consistent result, measure both ingredients accurately and combine them with the chocolate and peanut butter before adding the cereal. Once the mixture is smooth, work efficiently so it is easy to distribute and press into the prepared pan.
Essential Equipment for Making No-Bake Bars
You do not need a long list of kitchen tools to prepare these homemade chocolate peanut butter bars. An 8×8-inch baking dish provides the right shape for forming an even layer, while parchment paper makes removing the chilled mixture much easier. A microwave-safe bowl is useful for melting the chocolate mixture, and a large mixing bowl provides enough room to coat the cereal evenly. A sturdy spatula helps with stirring, pressing, and smoothing the mixture. Finally, a sharp knife makes portioning the chilled bars simple. Preparing these basic tools before starting allows you to complete each step smoothly and avoid unnecessary mess.
How to Prepare the Baking Dish Properly
Begin by lining an 8×8-inch baking dish with parchment paper, leaving enough paper hanging over two opposite sides to create handles. These overhanging edges make it possible to lift the entire chilled mixture out of the dish without breaking the bars. Smooth the parchment into the corners so the mixture can spread evenly across the bottom. You do not need to bake or preheat the dish. Taking a moment to prepare the pan properly makes a real difference when it is time to remove the bars, especially if you want neat squares with clean edges for serving.
How to Melt Chocolate Without Burning It
Place the chocolate chips, peanut butter, pure maple syrup, and coconut oil in a microwave-safe bowl. Heat the mixture in 30-second intervals, stirring after each interval to distribute the warmth. Continue until the ingredients have melted into a smooth, uniform mixture. Avoid leaving the bowl in the microwave for too long without checking it, as chocolate can overheat quickly. If a few small pieces remain, stir the mixture and allow the residual heat to soften them before microwaving again. Gentle heating helps preserve a smooth consistency and makes it easier to coat the crispy rice cereal evenly.
How to Combine the Chocolate Mixture with the Cereal
Once the chocolate and peanut butter mixture is completely smooth, place the crispy rice cereal in a large bowl and pour the melted mixture over it. Use a spatula to fold the ingredients together until the cereal is coated as evenly as possible. Scrape along the bottom and sides of the bowl to incorporate any chocolate mixture that collects there. Work carefully to distribute the coating without crushing the cereal. An even coating improves both the flavor and the structure of the finished bars, ensuring that the chocolate binds the cereal together rather than leaving dry or loosely connected sections.
Pressing the Mixture for Firm, Sliceable Bars
Transfer the coated cereal mixture into the prepared baking dish and spread it into an even layer. Use the back of a spatula or a large spoon to press the mixture firmly into the corners and along the edges. This step is important because loose sections may crumble when the bars are cut. Apply steady pressure across the entire surface without crushing the cereal excessively. A level top also makes the finished dessert look more attractive when sliced. Once the mixture is firmly packed, place the dish in the refrigerator and allow enough time for the chocolate mixture to become completely firm.
How Long to Chill No-Bake Chocolate Peanut Butter Bars
Refrigeration is what allows these no-bake bars to hold their shape. Chill the mixture for approximately 60 to 90 minutes, checking that the center is firm before attempting to remove it from the pan. The exact setting time can vary depending on your refrigerator temperature, the thickness of the mixture, and the ingredients used. Although the original preparation schedule lists a 65-minute chill, allowing additional time when necessary can help prevent soft or crumbly slices. Avoid cutting the bars while the chocolate mixture is still soft, as they may lose their shape and become difficult to handle.
How to Slice and Serve the Bars Neatly
After the mixture has set completely, use the parchment paper to lift it out of the baking dish and transfer it to a cutting board. With a sharp knife, cut the slab into squares or rectangles of your preferred size. For cleaner cuts, wipe the blade between slices to remove chocolate and cereal crumbs. If the bars become slightly soft while you are cutting them, return them to the refrigerator briefly before continuing. These chocolate peanut butter crunch bars are best served chilled, when the chocolate mixture is firm and the cereal provides a pleasant contrast in texture.
Storage Tips to Keep the Bars Fresh
Store the finished bars in an airtight container in the refrigerator for up to seven days. Keeping them chilled helps the chocolate mixture remain firm and makes the bars easier to stack or pack for snacks. If you need to store them for a longer period, freeze the bars in an airtight, freezer-safe container for up to three months. Placing parchment paper between layers can help prevent sticking. For individual portions, wrap the bars separately before freezing. Allow a frozen bar to soften slightly before eating, while keeping in mind that the texture may change a little after freezing and thawing.
Flavor Variations for Homemade Chocolate Crunch Bars
These easy chocolate peanut butter crunch bars can be presented in different ways without changing the five core ingredients. For a sweet-and-salty finish, sprinkle a small amount of flaky sea salt over the surface before refrigerating. If you prefer extra texture, chopped peanuts can be added to the cereal mixture, although they are optional additions rather than part of the original ingredient list. You can also experiment with dark, semi-sweet, or milk chocolate chips to adjust the sweetness. Keep the original ingredient quantities unchanged when making the standard recipe so the bars retain their intended consistency.
Common Mistakes to Avoid When Making No-Bake Bars
A few simple precautions can help you achieve better results with this no-bake dessert. Overheating the chocolate mixture may make it difficult to stir smoothly, so always use short microwave intervals. Uneven mixing can leave some cereal pieces dry, while insufficient pressing may cause the bars to fall apart during slicing. Another common mistake is cutting the mixture before it has completely set. Allowing enough refrigeration time helps the chocolate firm up and hold the cereal together. Measuring accurately, mixing gently, and pressing evenly are the most useful steps for creating consistent bars at home.
Are These Chocolate Peanut Butter Bars Suitable for Meal Prep?
These bars are convenient for preparing snacks ahead of time because they can be portioned and stored in the refrigerator or freezer. Once chilled and sliced, they are easy to pack into individual containers for planned snacks throughout the week. Their compact shape also makes them practical for dessert boxes and casual gatherings. For the best texture, keep the bars refrigerated until you are ready to serve them, particularly in warm weather. If packing them for lunchboxes or travel, consider the temperature and storage conditions, since the chocolate mixture can soften when left at room temperature for extended periods.
When to Serve Chocolate Peanut Butter Crunch Bars
These no-bake chocolate peanut butter bars work well for many occasions because they are easy to prepare, portion, and share. Serve them after a family dinner, arrange them on a holiday dessert tray, or include them alongside cookies and brownies at a potluck. They are also a useful option when unexpected guests arrive and you need a homemade treat without baking. For a simple dessert presentation, arrange the chilled squares on a serving plate and keep them refrigerated until serving time. Their chocolate flavor and crispy texture make them an appealing addition to casual celebrations and everyday sweet snacks.
Frequently Asked Questions About No-Bake Chocolate Peanut Butter Crunch Bars
Can I make these chocolate peanut butter bars without an oven?
Yes, this recipe is completely oven-free. The chocolate chips, peanut butter, maple syrup, and coconut oil are combined using a microwave, while the refrigerator does the work of setting the mixture. You do not need to bake the bars or preheat the oven. This makes the recipe particularly convenient when you want a homemade dessert with minimal equipment and a short active preparation time.
How long do no-bake chocolate peanut butter bars take to set?
The bars generally need 60 to 90 minutes in the refrigerator. The exact time depends on the thickness of the mixture and how cold your refrigerator is. Check the center before lifting the mixture from the pan. If it still feels soft, leave it chilled for longer. Waiting until the bars are firm makes slicing easier and helps prevent the cereal mixture from crumbling.
Why are my chocolate peanut butter bars falling apart?
Bars that crumble may not have been pressed firmly enough into the baking dish, or they may have been sliced before they were completely chilled. Uneven coating can also leave sections that do not bind together properly. To improve the result, coat the cereal thoroughly, press the mixture evenly into the pan, and allow sufficient refrigeration time. Using parchment paper also helps you remove the slab without damaging its shape.
Can I freeze homemade chocolate peanut butter crunch bars?
Yes, these bars can be frozen for up to three months in an airtight container. For easier serving, separate individual portions with parchment paper or wrap them separately. When you want to enjoy a bar, let it soften slightly before eating. Keep in mind that freezing and thawing may affect the cereal’s crispness somewhat, so store the bars carefully and avoid unnecessary temperature changes.
How should I store these no-bake dessert bars?
Place the bars in an airtight container and refrigerate them for up to seven days. Refrigeration helps maintain their firm texture and keeps the chocolate from becoming too soft. If stacking the bars, separate the layers with parchment paper to reduce sticking. For longer storage, freezing is a suitable option. Avoid leaving the bars in a warm environment for extended periods because the chocolate mixture may soften.
Notes for the Best Chocolate Peanut Butter Crunch Bars
For consistently good results, prepare the parchment-lined pan before melting the ingredients so the mixture can be transferred immediately after mixing. Heat the chocolate mixture gradually and stir between intervals to prevent scorching. Fold the cereal in gently, making sure each piece receives an even coating. Press the mixture firmly into the dish, paying attention to the corners and edges. Refrigerate for the full setting time, extending it if needed, and use a sharp knife to cut clean portions. Store the finished bars in an airtight container in the refrigerator for up to seven days or freeze them for up to three months.
Nutritional Information and Serving Considerations
These chocolate peanut butter crunch bars provide a rich combination of chocolate, peanut butter, and crispy cereal in a convenient dessert portion. The supplied nutritional figures list approximately 250 calories, 14 grams of fat, 6 grams of saturated fat, 13 grams of carbohydrates, 12 grams of sugar, 1 gram of fiber, 5 grams of protein, and 80 milligrams of sodium per serving. These figures are estimates and may vary depending on the chocolate chips, peanut butter, cereal, and maple syrup brands you use. Portion size also affects the nutritional values, so treat the figures as a general guide rather than laboratory-verified information.
Easy Dessert Recipe · American Cuisine · No-Bake
No-Bake Chocolate Peanut Butter Crunch Bars
Description
These easy No-Bake Chocolate Peanut Butter Crunch Bars combine melted chocolate, creamy peanut butter, crispy rice cereal, pure maple syrup, and coconut oil for a rich, crunchy homemade dessert. The mixture is pressed into a pan and refrigerated until firm, creating delicious bars without the need for an oven.
Preparation and Cooking Duration
Prep time
15 minutes
Chill time
60–90 minutes
Cooking time
No oven required
Total time
1 hr 15–45 min
Serving: Cut into your preferred number of squares or rectangles. The supplied source does not specify a reliable number of portions, so the exact serving count will depend on how you slice the bars.
Ingredients
- 1 ½ cups (375 ml) chocolate chips
- 1 cup (250 ml) peanut butter
- 3 cups (750 ml) crispy rice cereal
- ½ cup (125 ml) pure maple syrup
- ¼ cup (60 ml) coconut oil
Step-by-Step Instructions

1. Prepare the baking dish
Line an 8×8-inch baking dish with parchment paper, leaving extra paper hanging over the sides. This will make it easier to lift the chilled bars out of the dish.

2. Combine the chocolate ingredients
Add the chocolate chips, peanut butter, pure maple syrup, and coconut oil to a microwave-safe bowl.

3. Melt until smooth
Microwave in 30-second intervals, stirring after each interval until the mixture is fully melted and smooth. Avoid overheating the chocolate.

4. Coat the crispy rice cereal
Place the crispy rice cereal in a large bowl. Pour the melted chocolate mixture over the cereal and stir gently until evenly coated.

5. Press into the pan
Transfer the coated cereal mixture into the prepared dish. Press firmly with a spatula to create a compact, even layer.

6. Refrigerate until firm
Chill for 60–90 minutes, or until the mixture is completely firm and ready to slice.

7. Slice and serve
Lift the mixture out using the parchment paper. Cut into squares or rectangles with a sharp knife and serve chilled.
Notes
- Heat the chocolate mixture gradually and stir between microwave intervals.
- Make sure the crispy rice cereal is evenly coated before transferring it to the pan.
- Press the mixture firmly to help the bars hold together.
- Allow the bars to become completely firm before slicing.
- Store in an airtight container in the refrigerator for up to seven days.
- Freeze in an airtight container for up to three months.
- Optional additions, such as flaky sea salt or chopped peanuts, can provide extra flavor and texture but are not included in the original ingredient list.
Nutritional Information
Approximate values per stated serving; actual values depend on ingredients and portion size.
Calories
250 kcal
Total fat
14 g
Saturated fat
6 g
Carbohydrates
13 g
Sugar
12 g
Fiber
1 g
Protein
5 g
Sodium


