If you’ve been searching for the perfect gluten-free bread recipe that’s simple, reliable, and doesn’t require complicated techniques, this no-knead gluten-free bread is exactly what you need. Designed for beginners and experienced bakers alike, this recipe delivers a soft, fluffy interior with a lightly crisp golden crust—without using eggs, butter, or kneading.
This easy homemade gluten-free bread is ideal for anyone following a vegan, dairy-free, or allergy-friendly diet. Unlike traditional bread recipes that rely heavily on gluten development and kneading, this version uses a simple mix-and-pour method that saves time and effort while still producing excellent results.
Whether you want a loaf for sandwiches, toast, or everyday meals, this recipe proves that gluten-free baking can be both easy and delicious.
Why This No-Knead Gluten-Free Bread Works So Well
Gluten-free bread can often be tricky, but this recipe simplifies everything.
No Kneading Required
Traditional bread relies on kneading to develop gluten structure. Since gluten-free flour lacks this protein, kneading isn’t necessary—making this recipe quicker and easier.
Completely Egg-Free and Dairy-Free
Perfect for those with dietary restrictions, this bread is naturally vegan and free from common allergens like eggs and butter.
Quick and Beginner-Friendly
With just a short preparation time and minimal steps, this is one of the easiest gluten-free bread recipes you can try.
Soft Texture with a Light Crust
The result is a bread that’s soft inside, slightly chewy, and has a beautifully baked crust.
Versatile Everyday Bread
Use it for toast, sandwiches, or serve alongside soups and salads.
Understanding the Ingredients (Why Each One Matters)
Each ingredient in this vegan gluten-free bread recipe plays an essential role in creating the right texture and flavor.
Gluten-Free Flour Blend (with Xanthan Gum)
This is the foundation of the bread. A high-quality gluten-free flour blend that includes xanthan gum helps mimic the elasticity and structure of gluten.
Warm Water
Warm water activates the yeast and hydrates the flour, creating a batter-like dough that’s essential for no-knead bread.
Sugar or Honey
A small amount of sweetness feeds the yeast, helping the dough rise properly. It also adds a subtle flavor.
Active Dry Yeast
This is what gives the bread its rise and airy texture. Proper activation is key to success.
Salt
Balances the flavors and strengthens the overall structure of the bread.
Olive Oil
Adds moisture and richness, ensuring the bread stays soft and tender.
Optional Ingredients for Enhanced Results
Chia or Flax Meal
Acts as a natural binder, improving structure and moisture retention.
Apple Cider Vinegar
Helps create a lighter texture and improves the rise of gluten-free dough.
Step-by-Step Guide to Making Gluten-Free No-Knead Bread
Step 1: Activate the Yeast
Start by combining warm water with sugar (or honey) and active dry yeast.
Let it sit for 5–10 minutes until it becomes foamy. This step confirms the yeast is active and ready to use.
Step 2: Mix the Dough
In a mixing bowl, add:
• Gluten-free flour blend
• Salt
• Olive oil
• Optional chia/flax meal and apple cider vinegar
Pour in the activated yeast mixture.
Stir everything together until you get a thick, sticky batter-like dough. This is normal—no kneading required.
Step 3: Transfer to Baking Pan
Grease a loaf pan lightly with oil.
Pour the batter into the pan and smooth the top using a spatula.
Step 4: Let the Dough Rise
Cover the pan with a clean towel.
Place it in a warm, draft-free area and allow it to rise for 30–45 minutes, or until slightly puffed.
Step 5: Bake the Bread
Preheat your oven to 190°C (375°F).
Bake the bread for 40–45 minutes, until:
• The top is golden brown
• The loaf feels firm
• A toothpick inserted comes out clean
Step 6: Cooling is Crucial
Remove the bread from the oven and let it cool completely before slicing.
This step is essential because gluten-free bread continues to set as it cools. Cutting too early can make it crumbly or gummy.
Expert Tips for Perfect Gluten-Free Bread
Adjust Consistency if Needed
If the dough feels too thick, add a little extra water to loosen it.
Use Fresh Yeast
Expired yeast will prevent the bread from rising properly.
Don’t Skip Cooling
Cooling ensures clean slices and better texture.
Use the Right Pan Size
A standard loaf pan works best for even baking.
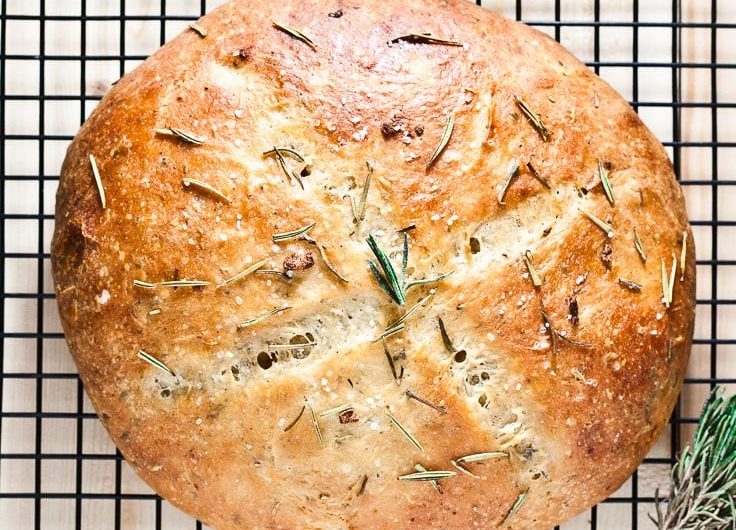
Flavor Variations & Add-Ins
You can easily customize this homemade gluten-free loaf:
• Add herbs like rosemary or thyme for a savory twist
• Mix in seeds such as sunflower or sesame for texture
• Add garlic powder for extra flavor
• Sprinkle oats or seeds on top before baking
Serving Ideas
This bread pairs well with:
• Vegan butter or olive oil
• Nut butter or jam
• Sandwich fillings
• Soups and stews
It’s incredibly versatile for daily meals.
Storage and Shelf Life
Room Temperature
Store in an airtight container for up to 2 days.
Refrigerator
Keeps fresh for up to 5 days.
Freezer
Slice and freeze for up to 2 months. Toast before serving.
Nutritional Benefits
This gluten-free vegan bread is:
• Free from gluten, dairy, and eggs
• Suitable for sensitive diets
• Lower in allergens compared to traditional bread
• Easy to digest
Common Questions Answered
Why is my bread dense?
It could be due to inactive yeast or thick batter.
Can I make this bread without xanthan gum?
It’s not recommended, as xanthan gum helps bind the structure.
Can I use different gluten-free flour blends?
Yes, but results may vary depending on the blend.
Final Thoughts
This easy no-knead gluten-free bread recipe is proof that homemade bread doesn’t have to be complicated. With minimal effort and simple ingredients, you can create a delicious loaf that’s soft, satisfying, and perfect for everyday use.
Whether you’re new to gluten-free baking or just want a reliable go-to recipe, this one is sure to become a staple in your kitchen.
Quick Gluten-Free No-Knead Bread Recipe Card
Prep Time: 10 minutes
Rise Time: 30–45 minutes
Cook Time: 40–45 minutes
Total Time: 1 hour 20 minutes
Ingredients
- 2 cups gluten-free flour blend (with xanthan gum)
- 1 ½ cups warm water
- 1 tbsp sugar or honey
- 2 ¼ tsp active dry yeast
- 1 tsp salt
- 2 tbsp olive oil
Optional:
- 1 tbsp chia or flax meal
- 1 tbsp apple cider vinegar
Instructions
- In a bowl, mix warm water, sugar (or honey), and yeast. Let sit 5–10 minutes until foamy.
- Add gluten-free flour, salt, olive oil, and optional ingredients.
- Stir until a thick, sticky batter forms (no kneading needed).
- Pour into a greased loaf pan and smooth the top.
- Cover and let rise for 30–45 minutes.
- Bake at 190°C (375°F) for 40–45 minutes until golden.
- Cool completely before slicing.
Notes
• Add extra water if batter feels too thick
• Vinegar improves texture and rise
• Always cool before cutting for best results