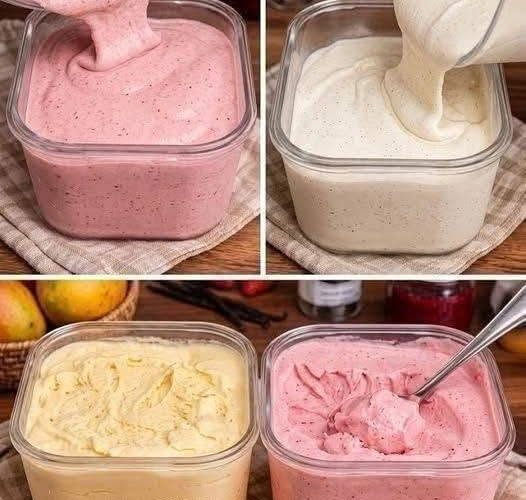
Homemade vanilla ice cream is one of those desserts that never really goes out of style. It is creamy, sweet, smooth, and full of the familiar vanilla flavor that works beautifully with almost any topping or baked dessert. This easy no-churn vanilla ice cream is especially convenient because you do not need an ice cream machine, custard base, stovetop cooking, or a thermometer. With cold heavy whipping cream, sweetened condensed milk, and pure vanilla extract, you can create a rich frozen dessert with very little preparation.
Why This Easy Vanilla Ice Cream Recipe Works
The simplicity of this homemade ice cream recipe is one of its biggest advantages. Heavy whipping cream provides the airy structure and creamy texture, while sweetened condensed milk supplies sweetness and richness. Pure vanilla extract gives the mixture its classic flavor. Instead of making a traditional cooked custard, this method relies on whipped cream and gentle folding, which makes it much easier for beginners. Once combined, the mixture is transferred to a freezer-safe container and chilled until firm.
What Makes It a No-Churn Ice Cream
Traditional homemade ice cream is often made with an ice cream machine that continuously churns the mixture as it freezes. Churning helps reduce the formation of large ice crystals and creates a smooth texture. This recipe takes a simpler approach. The heavy cream is whipped until stiff peaks form, creating plenty of air in the mixture before the condensed milk is folded in. When the mixture freezes, that whipped structure helps produce a creamy, scoopable texture without requiring specialized equipment.
The Three Main Ingredients
The basic recipe uses three main ingredients: cold heavy whipping cream, sweetened condensed milk, and pure vanilla extract. Each ingredient has a specific purpose, so using the ingredients as listed is important for achieving the intended consistency. The heavy cream needs to be cold enough to whip properly, while sweetened condensed milk provides both sweetness and richness. Vanilla extract brings the familiar flavor that makes this dessert recognizable as classic vanilla ice cream.
Choosing the Right Heavy Whipping Cream
Cold heavy whipping cream is essential for this recipe because it needs to increase significantly in volume when beaten. A chilled cream whips more efficiently and is more likely to reach stiff peaks. If your kitchen is particularly warm, chilling the mixing bowl and beaters before starting can also be helpful. The cream should be poured directly into the bowl while cold, and it should be beaten only until it becomes thick enough to hold its shape.
Why Sweetened Condensed Milk Is Important
Sweetened condensed milk does more than simply make the ice cream sweet. It contributes richness and helps create the smooth consistency associated with no-churn ice cream. It is important to distinguish sweetened condensed milk from evaporated milk because they are not interchangeable in this particular recipe. The condensed milk is already sweetened and concentrated, making it especially useful for a simple frozen dessert that does not require additional sugar or a cooked syrup.
Getting the Vanilla Flavor Right
Vanilla is the main flavor in this recipe, so pure vanilla extract can make a noticeable difference. The source recipe specifies 1–2 teaspoons, allowing you to choose the intensity that suits your taste. One teaspoon provides a balanced vanilla flavor, while two teaspoons create a more pronounced vanilla profile. Vanilla bean seeds or vanilla bean paste can also be used as an optional variation, but the basic recipe works perfectly well with pure vanilla extract.
Why Cold Ingredients Matter
Temperature plays an important role in making successful no-churn vanilla ice cream. The heavy whipping cream should be thoroughly chilled before it is whipped. Cold cream generally reaches the desired volume more easily than warm cream. This becomes especially important in a warm kitchen, where cream can lose its chilled temperature quickly. Taking a few minutes to chill the bowl and beaters as well can make the whipping stage more comfortable and reliable.
How to Whip the Cream Correctly
Pour the cold heavy whipping cream into a large mixing bowl and beat it with an electric hand mixer or stand mixer. Continue until the cream forms stiff peaks. You can check this by lifting the beaters from the bowl. The whipped cream should hold its shape rather than immediately collapsing back into the mixture. Once stiff peaks have formed, stop mixing. Continuing to beat the cream beyond this stage can make it grainy and eventually cause it to move toward a butter-like consistency.
Why Overwhipping Should Be Avoided
It can be tempting to continue mixing because you want the cream to become as thick as possible, but overwhipping can work against you. Once the cream has reached stiff peaks, the structure is strong enough for the next stage. Beating it for too long can damage the smooth texture and make the mixture grainy. The goal is not simply to make the cream as thick as possible. Instead, you want stable whipped cream that can hold air while still maintaining a smooth, creamy appearance.
Folding in the Condensed Milk
Once the cream has reached stiff peaks, add the sweetened condensed milk. This step should be handled gently. Instead of stirring vigorously, use a rubber spatula to fold the condensed milk into the whipped cream. Gentle folding helps preserve the air that was incorporated during whipping. That air is important because it contributes to the lighter texture of the finished no-churn vanilla ice cream. The mixture should gradually become smooth while still retaining some of the volume created by the whipped cream.
Adding the Vanilla Extract
After the condensed milk has been incorporated, add 1–2 teaspoons of pure vanilla extract. Fold it gently into the mixture until the vanilla is evenly distributed. At this stage, the ice cream base should look thick, smooth, and fluffy. Avoid unnecessary stirring because the goal is to maintain the light structure developed during whipping. A gentle folding motion is enough to distribute the vanilla without unnecessarily deflating the cream.
Optional Mix-Ins for Homemade Ice Cream
Classic vanilla ice cream is delicious by itself, but this recipe also provides a flexible base for other flavors. Optional additions include mini chocolate chips, chopped chocolate, crushed sandwich cookies, fresh strawberries, diced mango, caramel sauce, chopped toasted nuts, fudge sauce, and cookie pieces. These additions can be folded into the mixture before freezing. If using a sauce such as caramel or fudge, lightly swirling it through the mixture can create attractive ribbons of flavor instead of blending the sauce completely into the base.
Preparing the Freezer Container
Before transferring the mixture, have an airtight freezer-safe container ready. A shallow container can be particularly convenient because it can make the finished ice cream easier to scoop. Spoon the prepared mixture into the container and use a spatula to smooth the surface. For additional protection, a sheet of parchment paper or freezer-safe wrap can be placed directly over the surface before the lid is secured. This can help reduce direct exposure to air during freezing.
Freezing the Vanilla Ice Cream
Place the covered container in the freezer and allow the ice cream to freeze for approximately 4–6 hours, or until it becomes firm. The exact freezing time can vary depending on the depth of the container, freezer temperature, and the amount of mixture being frozen. A shallow container may freeze more quickly than a deep one. The important point is to give the ice cream enough time to become thoroughly firm before serving rather than judging doneness only by the surface.
How to Get a Creamy Frozen Texture
The texture of homemade no-churn ice cream depends heavily on how the whipped cream is handled. Starting with cold heavy cream, stopping at stiff peaks, and folding the condensed milk gently all contribute to the final consistency. Excessive liquid can also increase the amount of ice formation during freezing, so watery additions should be used carefully. When adding fruit, choose small pieces or a thick puree rather than introducing a large amount of thin liquid into the base.
How to Scoop Homemade Ice Cream Easily
Freshly frozen ice cream can sometimes be firm, particularly if it has been stored overnight or for several days. There is no need to struggle with a scoop straight from the freezer. Allow the container to stand at room temperature for about 3–5 minutes before serving. This short resting period softens the surface slightly and makes scooping easier. A shallow container can also help because it reduces the distance a spoon or scoop needs to travel through the frozen mixture.
Easy Cookies and Cream Variation
To turn the vanilla base into cookies and cream ice cream, gently fold crushed chocolate sandwich cookies into the mixture before freezing. Reserve a few pieces for sprinkling over the top if desired. The vanilla base provides a creamy background for the chocolate cookie pieces, while the crushed cookies create a pleasant contrast in texture. This variation follows the same no-churn method, so you do not need to prepare a separate base or change the basic freezing process.
Simple Chocolate Chip Vanilla Variation
Chocolate chip vanilla ice cream is another easy variation that requires very little adjustment. Mini chocolate chips or finely chopped chocolate can be gently folded into the prepared vanilla mixture. Smaller pieces work especially well because they distribute more evenly throughout the ice cream and are easier to eat once frozen. The mild sweetness of vanilla pairs naturally with chocolate, making this an easy option when you want something slightly more interesting than plain vanilla without changing the basic recipe.
Fresh Strawberry Vanilla Ice Cream
Fresh strawberries can turn the basic vanilla recipe into a fruity frozen dessert. Chop the strawberries into small pieces and fold them gently into the finished vanilla mixture. A small swirl of strawberry sauce can also be added for stronger fruit flavor. Because fruit contains water, it is best not to add excessive quantities of watery ingredients. Keeping the fruit pieces relatively small helps distribute them throughout the ice cream while maintaining a pleasant texture.
Mango Vanilla Ice Cream Variation
Ripe mango can give this homemade ice cream a tropical flavor. The source recipe suggests using finely diced mango or a thick mango puree. A thick puree is preferable to a watery mixture because excess liquid can affect the final frozen texture. The sweetness and fragrant flavor of ripe mango complement the creamy vanilla base particularly well. If using mango puree, incorporate it gently and avoid adding so much that the mixture becomes loose.
Caramel Nut Ice Cream
For a richer variation, swirl caramel sauce through the vanilla base and add chopped toasted nuts. The caramel introduces a deep, buttery sweetness, while toasted nuts provide contrast and crunch. Rather than stirring the caramel completely into the mixture, use a spatula to create loose swirls. This technique gives individual scoops attractive ribbons of caramel and helps keep the flavor varied throughout the container.
Chocolate Swirl Vanilla Ice Cream
Chocolate fudge sauce can also be used to create a simple chocolate-swirl version. Spoon or drizzle the sauce over the prepared ice cream mixture and gently move a spatula through it to create swirls. Avoid fully mixing the sauce into the vanilla base. The goal is to leave visible chocolate ribbons that provide a stronger flavor in selected bites. This variation is particularly useful when you want chocolate flavor without turning the entire mixture into chocolate ice cream.
Best Toppings for Vanilla Ice Cream
Homemade vanilla ice cream is an excellent base for a wide range of toppings. Chocolate syrup, caramel sauce, fresh berries, sliced bananas, chopped nuts, sprinkles, whipped cream, crushed cookies, fresh mango, and warm fruit sauce can all be served alongside a scoop. Because the vanilla flavor is relatively mild, it works as a blank canvas for both fruity and chocolate-based toppings. You can keep the serving simple with one topping or create a dessert bar with several choices.
Serving It With Warm Desserts
One of the easiest ways to make homemade vanilla ice cream feel like a special dessert is to serve it alongside something warm. A scoop can be paired with brownies, chocolate cake, apple pie, fruit cobbler, or freshly baked cookies. The contrast between the warm baked dessert and cold creamy ice cream creates a satisfying combination of temperatures and textures. Vanilla is especially suitable for this purpose because its flavor complements rather than competes with the dessert served underneath it.
Making the Recipe Ahead
This no-churn vanilla ice cream is naturally suited to make-ahead preparation. Instead of preparing dessert immediately before guests arrive, the mixture can be assembled several hours in advance and placed in the freezer. This gives you more flexibility when preparing a meal or hosting a gathering. Since the recipe requires approximately 4–6 hours of freezing time, planning ahead ensures that the ice cream has enough time to become firm before serving.
Storage for the Best Quality
Store the finished ice cream in a tightly sealed, freezer-safe container. Keeping the container properly covered helps protect the dessert from freezer odors and reduces exposure to air, which can contribute to freezer burn. For the best texture and flavor, the source recipe recommends enjoying homemade no-churn ice cream within several days. If the ice cream becomes very firm after extended freezing, allow it to sit at room temperature for a few minutes before scooping.
Can You Make It Without an Electric Mixer?
An electric mixer makes this recipe considerably easier, but it is possible to whip the heavy cream by hand. A large whisk can be used, although reaching stiff peaks will require more time and physical effort. The important part is still the same: the cream needs to become thick enough to hold stiff peaks before the condensed milk is folded in. If making the recipe by hand, patience is important because rushing the process can make it difficult to achieve the required volume.
Can Vanilla Bean Be Used Instead?
Vanilla bean can be used if you want a more pronounced natural vanilla appearance and flavor. Scrape the seeds from a vanilla bean and add them along with the vanilla extract. The tiny black seeds create the familiar speckled appearance associated with vanilla bean ice cream. Vanilla bean paste can also be used as an alternative. These options are not required for the basic recipe, but they can make the dessert feel more special when you are preparing it for guests or a celebration.
Notes for Reliable Results
For the best homemade vanilla ice cream, keep the heavy cream cold, whip it only to stiff peaks, and fold the condensed milk gently. Avoid adding excessive watery ingredients if you customize the recipe with fruit. Use an airtight freezer-safe container and give the ice cream enough time to freeze completely. If it becomes too firm, allow it to rest at room temperature for 3–5 minutes before scooping. These simple details are more important than complicated techniques and make the recipe approachable for home cooks.
Why This Recipe Is Good for Beginners
This easy vanilla ice cream recipe removes many of the steps that can make traditional ice cream intimidating. There is no egg custard to cook, no stovetop heating, no thermometer, and no ice cream machine. The main technique is whipping the cream and gently folding the remaining ingredients into it. That makes this a practical choice for someone making homemade ice cream for the first time. Once the basic method is understood, the same vanilla base can also be adapted into many different flavors.
Homemade No-Churn Vanilla Ice Cream
Description
This Homemade No-Churn Vanilla Ice Cream is a creamy, smooth, and rich frozen dessert made without an ice cream machine. Cold heavy whipping cream is whipped until fluffy, then gently combined with sweetened condensed milk and pure vanilla extract. The mixture is frozen until firm and can be enjoyed as classic vanilla ice cream or customized with cookies, chocolate, fruit, caramel, fudge sauce, or nuts.
Preparation & Cooking Duration
Preparation Time: About 10 minutes
Freeze Time: 4–6 hours
Total Time: Approximately 4 hours 10 minutes to 6 hours 10 minutes
Method: No-churn
Difficulty: Easy
Serving
Servings: 6–8
Serve the ice cream slightly softened after 3–5 minutes at room temperature. Enjoy it plain or with chocolate syrup, caramel sauce, fresh berries, sliced bananas, chopped nuts, sprinkles, whipped cream, crushed cookies, fresh mango, or warm fruit sauce.
Ingredients
Vanilla Ice Cream Base
- 2 cups cold heavy whipping cream
- 1 can (14 ounces) sweetened condensed milk
- 1–2 teaspoons pure vanilla extract
Optional Mix-Ins
- Mini chocolate chips
- Chopped chocolate
- Crushed sandwich cookies
- Fresh strawberries
- Diced mango
- Caramel sauce
- Chopped toasted nuts
- Fudge sauce
- Cookie pieces
Step-by-Step Instructions
- Chill the cream: Make sure the heavy whipping cream is thoroughly cold before starting. For an even better result in a warm kitchen, chill the mixing bowl and beaters for a few minutes.
- Whip the cream: Pour the cold heavy whipping cream into a large mixing bowl. Beat with an electric hand mixer or stand mixer until stiff peaks form.
- Stop at stiff peaks: Once the whipped cream holds its shape when the beaters are lifted, stop mixing. Avoid overbeating because the cream can become grainy.
- Add the condensed milk: Pour the sweetened condensed milk into the whipped cream.
- Fold gently: Use a rubber spatula to gently fold the condensed milk into the whipped cream. Avoid vigorous stirring so the air in the whipped cream is preserved.
- Add vanilla: Add 1–2 teaspoons of pure vanilla extract according to your preferred vanilla strength.
- Combine carefully: Gently fold until the vanilla is evenly distributed and the mixture is thick, smooth, and fluffy.
- Add optional mix-ins: If desired, gently fold in mini chocolate chips, chopped chocolate, crushed sandwich cookies, fresh strawberries, diced mango, chopped toasted nuts, or cookie pieces. Caramel or fudge sauce can be lightly swirled through the mixture.
- Transfer to a container: Spoon the mixture into an airtight, freezer-safe container.
- Smooth the surface: Use a rubber spatula to smooth the top. If desired, place parchment paper or freezer-safe wrap directly over the surface before sealing.
- Cover tightly: Secure the container with its lid to protect the ice cream from freezer odors and excess air exposure.
- Freeze: Place the container in the freezer for approximately 4–6 hours, or until the ice cream is firm.
- Soften before scooping: If the ice cream has frozen very firmly, let it stand at room temperature for approximately 3–5 minutes.
- Serve: Scoop the homemade vanilla ice cream and serve with your favorite toppings or alongside warm brownies, chocolate cake, apple pie, fruit cobbler, or freshly baked cookies.
Notes
- Cold heavy whipping cream is important because it helps the cream whip properly and reach stiff peaks.
- Do not overwhip the cream. Stop as soon as it becomes thick and holds its shape.
- Fold the sweetened condensed milk gently to preserve the air incorporated into the whipped cream.
- Use regular sweetened condensed milk rather than evaporated milk because they are different products and are not interchangeable in this recipe.
- If your kitchen is warm, chilling the mixing bowl and beaters can make whipping the cream easier.
- Do not add excessive watery ingredients when using fruit because extra liquid can affect the frozen texture.
- Fresh strawberries and mango should be chopped into small pieces for easier distribution.
- Thick fruit puree works better than watery puree when creating fruit-flavored variations.
- Caramel and fudge sauce can be swirled through the mixture instead of fully mixed in for a ribboned effect.
- A shallow freezer-safe container can make the finished ice cream easier to scoop.
- Keep the container tightly sealed during storage to help reduce freezer burn and prevent the ice cream from absorbing strong freezer odors.
- If the ice cream becomes very hard after extended freezing, let it stand at room temperature for about 3–5 minutes before scooping.
- Homemade no-churn ice cream is best enjoyed within several days for the best texture and flavor.
- An electric mixer is recommended for convenience, but the cream can also be whipped by hand with a whisk.
- Vanilla bean seeds or vanilla bean paste can be used as an optional flavor variation.
- For the classic version, simply leave out all optional mix-ins and enjoy the creamy vanilla base on its own.
Nutritional Information
Nutritional information was not provided in the supplied source recipe. Because the recipe contains heavy whipping cream and sweetened condensed milk, the exact nutritional values will depend on the brands used and the final serving size. Optional mix-ins and toppings will also change the calories, carbohydrates, fat, and other nutritional values. For accurate nutrition information, calculate the recipe using the exact products and quantities used and divide the total by the number of servings.


